Followers

Tuesday 13 December 2016

Old School Napoleonics

So a few days ago I once again headed across town (all of 15 minutes walk) to Stuart's house. When Stuart proposes an afternoon of old school wargaming, you know it's going to be pretty hardcore - that is, Old School all the way. Terrain, figures, rules and ambience. The latter means a good amount of chat and putting the wargames world to rights before the game can commence, and such a prequel includes admiring and discussing the figures in use.

In this case, Stuart had set out a French(ish) versus Russian game, using his collection of Warrior 25mm figures. These definitely have solid old school credentials, with the designs dating back to the seventies, although the figures are still available at the Warrior Miniatures site. Unfortunately at the moment photos are a bit scarce online, but the pictures below will give you the idea. As you might expect (if you don't already know the range) they are what today would be termed 'small' 25mm, with very elegant proportions and poses. Stuart's usual cracking paint job finished with gloss varnish made them a fine sight.


The Game
The terrain was loosely based on H.G. Wells' 'The Battle of Hook's Farm', a battlefield which I had already had a taste of in an earlier engagement. The scenario was a straightforward meeting engagement, using a one-side-of-A4 adaption of the Charge! rules, with distances and moves reduced to take into account the 3' width of Stuart's dining table. They are also modified to allow for the change from individual basing to basing in groups.

These rules gave an excellent, quick and bloody game. As I have mentioned in the past, Stuart has been using Charge! for decades, so any gaps in our crib sheet that needed filling in could be supplied from memory. I had in fact brought my copy of the rule book over, but this proved quite unnecessary. Indeed, at one point, with Stuart briefly out of the room making some tea, I dipped into the book to check up on a particular point. I soon felt a fatherly hand on my shoulder. "Now then old chap, no gentleman would feel the need to surreptitiously check the rule book. That might imply a lack of trust between players!". Quite right! 

Anyway, my Russians had some extraordinary good luck with their dice rolls, and I was able to give Stuart's Frenchmen a bit of a drubbing. How this unfolded will be shown below.

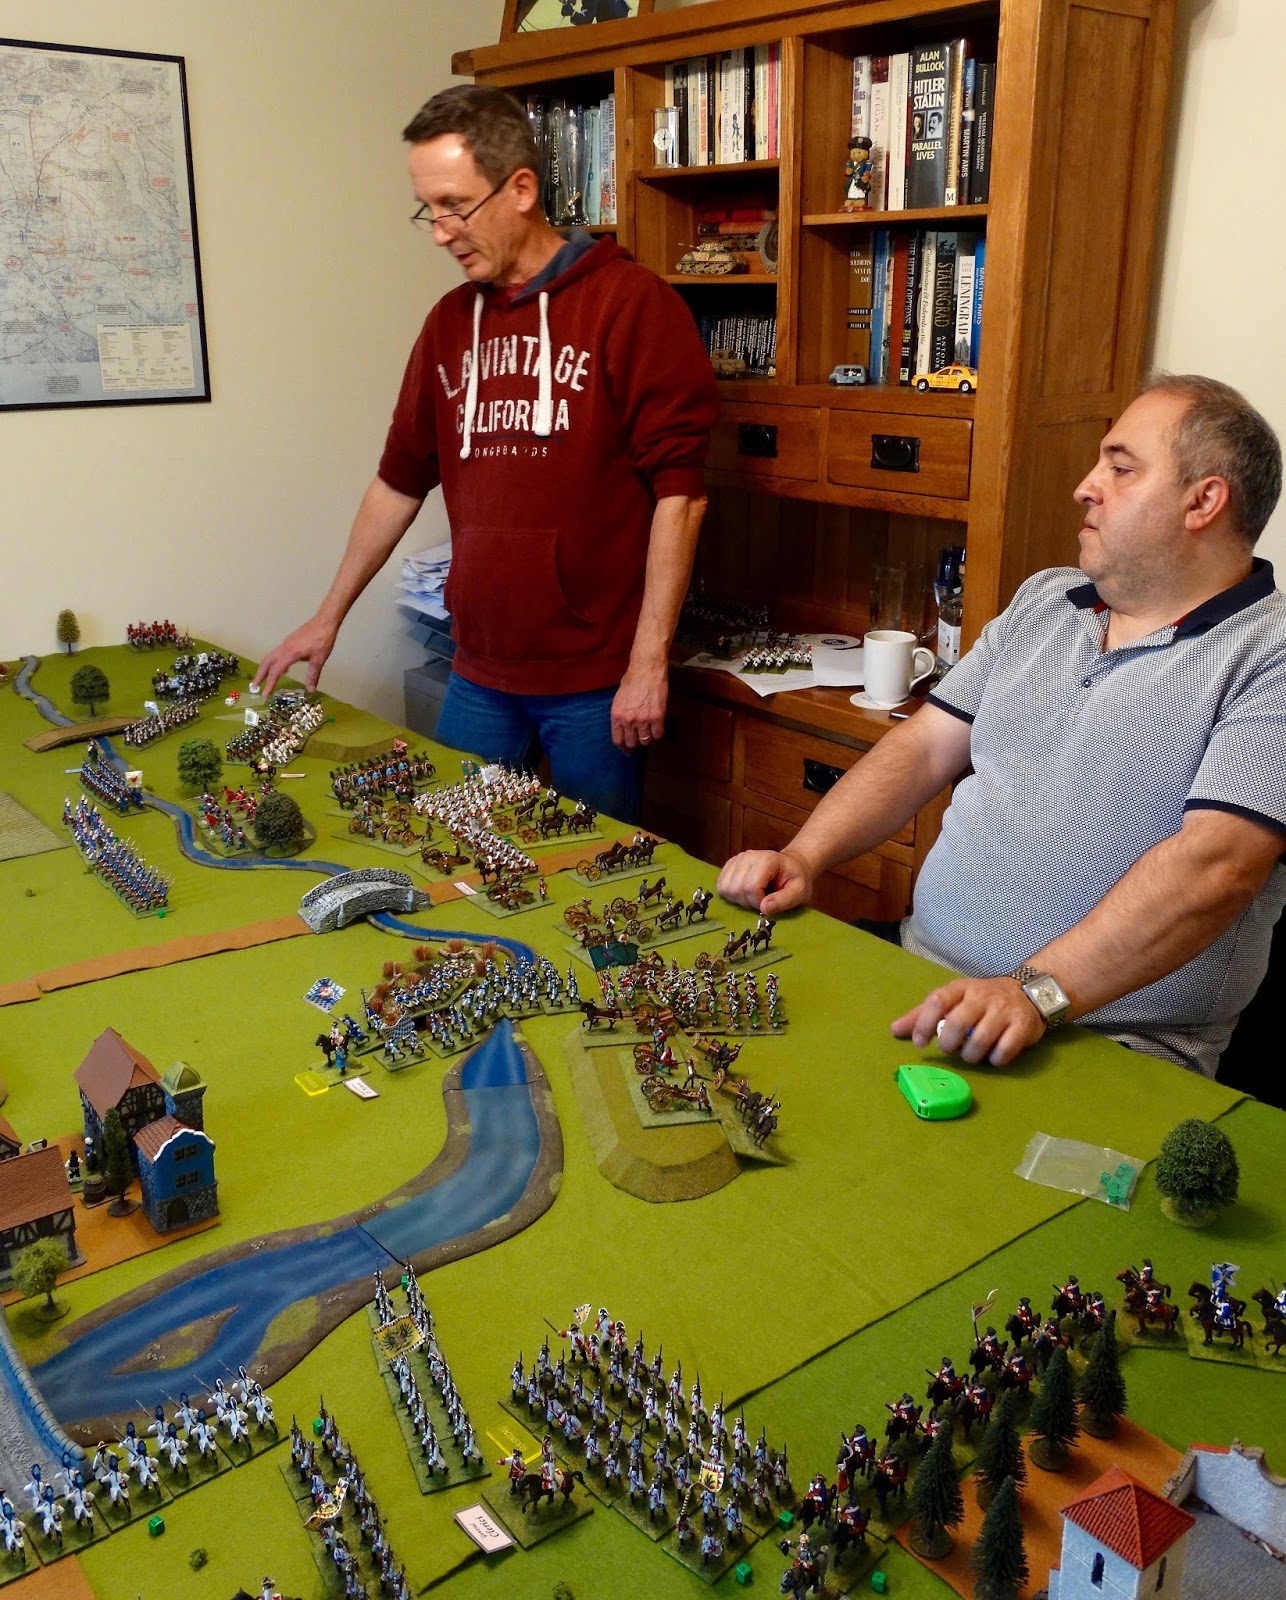
Game deployment. French on the left, Russians on the right.
Without much ado, the 2 sides came together across the table. Stuart looks uncharacteristically serious.
Russian line infantry and grenadiers engage advancing French light infantry.
I pushed a regiment of cossacks through a gap in the French line trying to shake things up a bit.
More infantry clashing on the Russian left centre.
By a miracle of dice rolling, my left wing cavalry was able to see off 2 out of the 3 opposing French cavalry regiments on my left wing. The cossacks then darted into the gap available as my leading regiments reformed. Cossacks versus cuirassiers? Surely my overconfidence would be punished! But the dice gods gave me another triumph against the odds.
Stuart contemplates the collapse of his right wing with cheerful insouciance. Or is that a grimace of horror?
Time for my cavalry to fall on the flank of his infantry! By this time the room curtains had been drawn. Whether this was because of the early onset of darkness at this time of year, or whether a gesture of mourning for the demise of the French army, I will never know.
After an initial set back, a similar story of Russian victory had unfolded on the other flank. Here the surviving white-horsed French cavalry are the meat in a Russian cavalry sandwich. Yes, the unit to the right is Russian, having nipped past the church onto the French baseline.
In the centre, the infantry contest had been much more even, with both sides taking heavy casualties. My artillery had managed to destroy the opposing French battery after some hard pounding on both sides. With his cavalry flanks in ruins, Stuart decided it was time to concede.

Time Gentlemen Please!
Stuart has been kind enough to be complimentary about Honours of War, but also honest enough to say they make his brain hurt. I know what he means. The game described above was a pleasure to play, but was also an intensely relaxing experience, particularly due to its simplicity. It is a mistake to say that old school wargaming is just about nostalgia. On the contrary - it has much to teach us. The modern trend towards wargames that emphasise the 'game' (over misguided aspirations to be a simulation), and which tries to achieve this by using simplified mechanisms and more straightforward play, owes much to the old school tradition which radiates from the 60s and early 70s.

People sometimes describe Honours of War as having a slightly old school feel. I am always glad to read such comments, because that element of HoW is deliberate. It is also fair to say that there is nothing very old school about Battlegroup Blitzkrieg (the other rule set I am currently playing) which I also enjoy. It has a number of fiddly mechanisms which can occasionally make one's brain hurt, but the intensity of the process is part of the pleasure of playing. As Neil Thomas's One Hour Wargames demonstrated, simplicity can be taken too far. The pleasure of old school gaming is that it respects the period and the players but doesn't pile on too much pressure when you are in the mood to chill out.

What a lucky chap I am to have good dose of variety in my wargaming at present, and this is particularly due to the varied approaches of the friends I am fortunate enough to play with.

And there I must leave it. 'Til next time!

Addendum 15th December


Sunday 13 November 2016

The Trimsos Project

Chapter 1. Trimsos 3, Sittangbad 2.
...and so Trimsos go through to the second round!

Okay, so this was the third engagement in the Trimsos Project initiated by Stuart and myself, and we played the Sittangbad scenario for the second time (although for the first time in the ancient period). Our little set of rules therefore had a further playtest, with me taking copious notes as various situations were discussed. Finding someone you can really co-operate with when developing rules is a great experience - not everyone can do the give-and-take required. And of course, for ideas on an Old School-style set of rules, who better to work with than one of wargaming's great Old Schoolers? The only problem is, each iteration gets more and more like Charge! for ancients! (Only joking Stuart).

The set-up was of course inspired by the classic Battle of Sittangbad. Palm trees were substituted for those seen in the original battle, and some ruined buildings suggested Sittangbad and Eisenberg. All, as usual, on Stuart's 6' x 3' dining table.

The set-up. The attacking forces are shown as set out to indicate what was available.
Arrival on the table would be in sets of 4 units on consecutive moves.
I took the attacking side. My heavy infantry is seen here pushing forward to clear the area around the ruined castle keep (a Hornby Skaledale model). One of the defending units has already been seen off (right of photo).
Unfortunately Stuart hadn't read the script - I thought Sittangbad was all about a delaying action, but instead I was subjected to an aggressive defence. In the foreground, Stuart's 'reserve' cavalry has charged forward and is outflanking my left. They have already seen off my light cavalry. My slingers are just visible behind the tress, and these were to be the next victims.
Although down to half strength, the enemy cavalry is still in being and continues to threaten. My own units are also rather depleted, but my heavy cavalry is attacking on my right.
Stuart's heavy cavalry have finally been destroyed, but my own infantry units have suffered heavily trying to dislodge the enemy from around the ruined keep. The impetuous charge of my heavy cavalry has been defeated and they are back where they started.
My chariots are keen to advance but my forces have suffered too heavily and 'Sittangbad' seems a long way away. With little chance of getting anywhere near the enemy's baseline, I conceded. Stuart toasts his victory with tea in his favourite  Gloucester Rugby mug. Honestly, there's nothing worse than a smug winner.

Chapter 2. In Which I Become A Wargames Butterfly.

"Let no man set out lightly upon the war-gamer's path, for it is fraught with perils..."
Peter Young, Charge!

This whole Trimsos thing started as a nostalgia event to refight a classic wargame, but has metamorphosed into an informal project to develop and use a set of simple, Old School ancient's rules for the occasional battle. I have enjoyed the whole thing so much that I have made the momentous decision to open a third front in my wargaming, or to put it another way, I'm starting a third period to add to the SYW and WW2. I suppose I'm technically already an ancients player, as I have a couple of 15mm DBA armies gathering dust somewhere, but they were always a sideshow. It was time, I finally decided, to jump in with both feet. Why?

Well, in over 40 years of wargaming, 'Ancients' is something I have never done. Just not my area of interest. However, the Trimsos Project had a few unique features which seemed inexorably to draw me in. Firstly, we followed the example of Donald Featherstone and Tony Bath from the original Trimsos game by using ancient armies that were very much generic - that is, any figures from the ancient period would do. To use the phrase from War Games, "what are a few hundred years amongst so many?". This opened up a fascinating vista - no need to decide on a period and restrict my choice of armies to that epoch. I could mix and match whatever ancient figures took my fancy and mould them into forces balanced any way I chose. It is of course common for ancient wargamers to fight battles between armies that were not historical opponents, particularly those wargamers using the various WRG rules. The Trimsos project extends that concept into the armies themselves - units from different eras of history (roughly from 1500BC to 500AD) can fight alongside each other under the same general. All they had to do was fit into a basic division of infantry or cavalry, then either light or heavy, as used in the original Battle of Trimsos.

Another issue was that of creating armies. Stuart had got things rolling with his 'economy' armies of 20mm plastics, but I couldn't rely exclusively on someone else's soldiers if I was truly to start a new period. Not wishing to embark on a lengthy period of collecting and painting, I looked at buying ready-painted second hand figures. 15mm might have been an option that was just about affordable, but I soon realised that only 28mm would do. I would have to bite the bullet and create my own armies, or the cost would just get silly. Stuart's concept came to the rescue and made things seem do-able: there was no need to start with the 15-20 figure units used by The Don, or aspire to the 40 or 50 figure units used by Charles Grant in his 1974 classic The Ancient War Game (see chapter 3). I could get started with the 12 figure infantry and 8 figure cavalry units Stuart was using. And the selection of 28mm hard plastic figures now available would be a source of low-cost but high quality models. And, I had the modest armies that took part in the original Trimsos battle forming an achievable target. My version of these is shown below:

Hyrkania
2 x heavy infantry units (18 figures each, phalanx with pikes)
1 x light infantry unit (12 figures, javelin men)
1 x light infantry unit (12 figures, slingers)
1 x heavy cavalry unit (8 figures)
1 x light cavalry unit (8 figures, javelins)
2 x elephants
1 x war engine

Hyperborea
3 x heavy infantry units (12 figures each)
1 x light infantry unit (12 figures, javelin men)
1 x light infantry unit (12 figures, archers)
4 x war chariots
1 x light cavalry unit (8 figures, mounted archers)
2 x war engines

I don't reckon that this total of figures (around 150, plus chariots, elephants and war engines) should be too great a target. The secret is to to enjoy the process of creating the new armies whilst also continuing to enjoy the periods I am currently playing.

I also decided to proceed cautiously. There would be no silliness involving buying hundreds of figures to produce a 'plastic mountain' which I would then laboriously work my way through. I would buy my figures in modest batches which I would paint up before buying more. In particular, if the whole process got too much and I lost interest, the stuff I had already painted could be sold at a profit on eBay. Having checked out what was available with some online searching, I decided to start by purchasing a box of Victrix Athenian Armoured Hoplites. That gave me 48 first class figures for £24. Do the maths - I thought that was good value. I've been getting on with them and here are some photos:

Assembled and undercoated (sans shields, of course - they go on last), you can see what nice figures these are.
The dark brown undercoat was an idea I found online. It works very well for me.
My first 12 figure unit. For the moment I'm going for the two Tony Bath nations of Hyperboria and Hyrkania
as the opposing forces. These chaps will form the core of the Hyperborean infantry. 
Rear view. I find these multi-pose hard plastics much easier to paint than metal figures. My basic block painting produced a result I was entirely pleased with, in a fairly quick timescale. Even assembling the figures was quite a fun experience.
The first 6 figure tranche of the next unit.
Yes, 18 figure units do look better, but I must be patient!
18 figures in 2 ranks.
The paint schemes are of course entirely of my own invention - another plus for the project!

The final plus of this project (so far) is the pleasure of creating the rules. Of particular interest is the process of sticking to the simple, original concept whilst writing rules that don't feel anachronistic to modern players. Hence, for example, troops will be 'light' (or 'skirmishing') or 'heavy' ('formed') only. Also only straightforward, unashamedly old-fashioned combat mechanisms will be used, along with a basic move-fire-melee turn structure. And no modern-style command and control.

I have been trying to make up a strapline for this project, and so far I have:
  • Trimsos: A Simple Game of Ancient Warfare
  • Trimsos: Playing With Toy Soldiers in the Ancient Period
  • Trimsos: Some Knockabout Fun in the World of Ancient Warfare
You get the picture. This is not the game for dedicated ancients fans. History will be toyed with and often just plain ignored. Forward to the 1960s!

Chapter 3. A Book of Two Smells - The Ancient War Game, by Charles Grant.
However gently I'm taking this project, no wargaming that I take part in will ever miss out on the opportunity to buy books. This one I found I couldn't overlook, as it combined some fine old games with a description of the various main eras and countries that make up the ancient wargaming period. It cost me £25 on Amazon, including p&p. A fine read, in Mr Grant's usual avuncular style.


Two smells? Well, first the lovely small of an old book - don't you just love that aroma? And secondly, the smell of When Wargaming Started To Go Wrong. Charles Senior is immensely pleased with the rules that had taken ancient wargaming by storm in 1974 - those of the Wargames Research Group, in their 3rd Edition when the book was written. "Certainly, any improvement could only be trifling", he states triumphantly. Ah well, 4 more editions were to come, then DBA, DBM, DBwhatever, etc, etc. As an exercise I downloaded the WRG 3rd Edition rules, which are still available on the internet (thanks to the History of WRG page). Frankly, I am happy these have been consigned to the dustbin of wargaming history. Reading them brought back memories of watching WRG ancients games at the Southampton and Bath clubs back in the 1980s - mostly, the games seemed to consist of people compiling lists of plus and minus factors on pads of paper every time firing, melee or morale were being conducted. The impression was one of extreme tedium, and was probably a major reason I never got into ancients!

To be fair, WW2 wargamers were stuck with equally awful rule sets, like the unplayable Firefly rules (which appear to been played by a fair number of people - how did they do it?). Anyway, suffice to say my own nostalgia (and I think I can say Stuart's as well) certainly doesn't include any set of WRG ancients rules, although the first edition is well worth a look for old times' sake.

The other book I will acquire in time is Tony Bath's Ancient Wargaming, published by John Curry's redoubtable 'History of Wargaming' project. Not that I'm going to start any ancient period campaigning, but I want the background to Mr Bath's wargaming world, and especially ideas for the names of countries, generals and units to add spice to my own gaming. Why copy Tony Bath? Simply as a tribute to his contribution to wargaming in general and ancient wargaming in particular. It is important to me to reference my sources of inspiration. For me, the early works of the wargaming greats form a sort of imaginary history (if you will), encompassing the beginning of the modern hobby of wargaming. Having largely set aside real history, keeping in touch with this spirit is a vital part of the Trimsos Project (at least for me. Stuart probably thinks I'm nuts).

Anyway, Christmas is coming up, so no need to buy straight away!

So, it seems a lot of threads are coming together to make this new venture inspiring. I have high hopes, tempered with a reasonable amount of caution. I will of course keep you all posted.

'Til next time!

Thursday 27 October 2016

The Battle Of Aufeld

And so, last Saturday, it was time for another large Honours of War bash. This would be the largest HoW game I had yet attempted, so it was going to be interesting to see whether the rules would continue to cope, and whether we would have the time to play the scenario to a reasonable conclusion. 

Thanks to Steve, Jon, Adam and Paul for making the effort to come over and get involved. Stuart, nice to see you as well - it was good to show you some of the figures you have gifted me in action. And then there was my eldest son Sam, who kept the teas and coffees coming, helped with lunch and then took over from Steve for the final couple of moves, when duty called Mr Johnson away.

The scenario was borrowed from Wargames Illustrated 286 (August 2011). The original article was In This Sign Conquer, by Ray Lucas, and was a fictional scenario set during the War of the Spanish Succession in Italy. So I changed the names and forces around, but kept essentially the same map. My version of the terrain is seen below.

The Battle of Aufeld. 10' x 6' table, each square 1' x 1'.
Some areas of terrain are labelled as a map key.
Situation
This was to be a fairly standard attack-defence game, with the Austrians attacking the Prussians in Saxony during 1761. The Austrians would get a decent advantage in numbers, but to further offset the usual Prussian advantage the Prussians would use the '1760 onwards' National Table, and the Austrians would have a 'dashing' commanding general.

Austrian deployment would be south of the red dashed line on the map, with Prussian deployment north and east of the blue dashed line. Despite the game size, I decided to allow the players to set out the available troops as they wished, rather than presenting them with troops already deployed. The latter saves time, but of course reduces player involvement. The Prussian players had to set out 3 brigades before the Austrians started their deployment. Then alternate brigades from each side would be deployed, which would leave the Austrians with the advantage of setting out their last few brigades in full knowledge of where the Prussians were. As umpire, I held back a brigade from each side to spring a minor surprise during the game, as well as a battalion of Prussian jaeger which would appear in the ruined monastery.

The only points to note about the terrain are that all hills are gentle, the 2 main towns are classed as 'urban', the ruined monastery is classed as 'rustic', and that due south of Aufeld the Sulzbach changes from a stream (to the east) into an impassable river (to the west).

Forces
I won't burden the reader with a full OOB of each side. Suffice to say that in total, the forces were:

Austria: 22 infantry battalions, 8 cavalry regiments, 9 artillery batteries.

Prussia: 15 infantry battalions, 6 cavalry regiments, 8 artillery batteries.

For anyone not familiar with my armies, infantry battalions are 20 figures, cavalry regiments 8 figures (a few had 12), and a single gun model forms a 'battery'.

The Game
It was of course impossible, given time and space considerations, to test this scenario in advance. As it was, most of Friday ended up being used to get everything set up and all the paperwork completed. But the game ended up being pretty well balanced, leading in the end to a minor Austrian victory. The number of moves completed wasn't recorded (the game was far too involving for that!), but I think we did about 7. I added on one move played solo after everyone had gone home, which merely confirmed the result. 

The Prussians were driven out of Aufeld twice, and the town was obviously untenable under the pressure of constant Austrian artillery fire, although the Austrian infantry attacks had themselves been driven off. The Prussians were nearly at their Army Break Point (half their number of units), and so were forced to retire. The Austrians were still short of their Break Point, but had taken one third casualties in units Done For, so I considered they were sufficiently damaged to be unable to claim a major victory. This had been a bloody infantry and artillery slogging match, with the Prussians predictably aggressive (with Paul in command), and the cavalry on both sides reduced to a secondary role.

The Pictures
Not the best set of photos I've ever taken, but they give a flavour of the game.

The night before the battle.
The troops are laid out in review awaiting the whims of their respective commanders.
The game commences. The Prussians move forward on their left flank, whilst the Austrians are refusing their right and going all-out on their left. I had my doubts about those Napoleonic-style infantry columns, but kept my thoughts to myself.
The heart of the Prussian position. Their main batteries are seen on the Aufeldsberg in the background, protected to their front by the cream of the army, the grenadiers. The less steady troops in the foreground are deployed in the shelter of Aufeld town.
The unexpected battalion of jaeger in the monastery are assaulted by Austrian infantry and dismounted dragoons. They were of course soon overcome, but had delayed and diverted the Austrian attackers from their main task.
The Prussians on the Aufeldsberg. There were strong batteries on both sides, and artillery fire was exchanged mercilessly throughout the game, focussing on enemy infantry formations. The 'grazing fire' rule saw extensive service, especially against those Austrian columns...
Austrian artillery positions south of Aufeld. Prussian jaeger have pushed forward in a delaying action, but were to be quickly dispersed once canister from the Austrian guns got their range.
Austrian grenadiers in column of battalions advance, with Aufeld across the river to their right.

The stirring sight of the Prussian grenadiers on the Aufeldsberg. They would soon be committed to a spoiling attack on the Austrians, which would cost them dear.
Austrian artillery fire has cleared Aufeld temporarily.
The poor quality Freikorps and allied units in this area huddle in its shelter trying to sort themselves out.

The Prussian grenadiers advance off the Aufeldsberg, with the Prussian left flank pushing forward into the empty space on the Austrian right. It appears the Prussians expected Austrian reinforcements to appear to fill this gap, but instead a brigade previously unseen in dead ground on the Austrian left centre has commenced a dangerous looking attack (foreground left). Damn that marsh!
Aufeld, blasted by artillery, is vacant and the Austrian infantry finally closes in.
The pressure appears to be telling on the Austrian commanders. The Prussian determination to play the game in the Austrian half of the table is creating a serious situation on the Prussian right.
The Austrian cuirassiers were sent around the extreme western flank, but they were under a 'dithering' commander and their advance was sluggish. Unfortunately, the umpire turned out to be similarly dithering and forgot to allow re-rolls of failed command dice, allowed when a dashing overall commander is in charge. Sorry guys!
The Austrian grenadiers have been thrown back, but their supporting German infantry storm over the bridge in a desperate last gasp attack. Bavarian troops are beginning to free themselves from the marsh in the top right of the photo and are also closing in on Aufeld. But predictably, the gun at the bridge blasted the attacking column back with devastating canister fire.
As the game drew to a close, the Prussian left flank cavalry galloped round onto the enemy baseline to try and break in behind the Austrian lines. They defeated the defending hussars, but the cost was high and supporting Austrian artillery (just seen at the left of the photo) saw them off in the next move.
And they think it's all over! It was. Time had run out. Sadly Steve missed the final team photo - we'll get you next time my friend. On the table, it can just be seen that Aufeld is re-occupied by the Prussians, but the order to retire is on its way. Prussian casualties, increased by their aggressive defence, have been too high.

Punditry
Well, everyone stated they enjoyed the game and it had been a pleasure to watch things unfold, with some competitive gaming leavened by good-natured banter. The scenario turned out to be a good one, and the rules coped well, although the first couple of moves were a little slow as everyone found their feet. Had the 'dashing commanding general' rule been properly applied, an even more exciting game might well have taken place. Damn my useless memory!

Two things occurred to me. First, I didn't put specific command allocations in place. This resulted in some occasionally lengthy discussions between commanders sharing the decisions. This might have been avoided if players had specific troops allocated to them.

Secondly, there was an interesting domination of the game by artillery. This has considerable historical support, especially in the latter part of the SYW. However, it was interesting to note that counter-battery fire was ignored by both sides, so that the guns continued to pound the enemy unabated as the turns progressed. This also has history on its side to a certain extent, but there may be a hole in the rules here. The particular problem is that hits are fairly easily rallied off when the enemy are outside 30cm, a common situation with counter-battery fire. So getting to the point where enemy guns are seriously affected is well-nigh impossible in some situations. But historically, it is clear that counter-battery fire could sometimes be effective.

My current idea is to take into account the fact that hits on artillery might not only affect the crews and supporting staff, but might result in actual destruction of the guns themselves. This material destruction obviously couldn't be rallied off. So, for every hit on an artillery battery, roll a D6. If you get a 5 or 6, an actual gun has been put out of action and this hit cannot be rallied off. Mark such hits with a different coloured die. In this way, long-distance pounding of your opponent's artillery may a be a bit more worthwhile.

And Finally...
Once again gentlemen, thank you one and all for a great day's gaming.

'Til the next time!

Saturday 8 October 2016

Gaming Models Kfz.13 and Munitionspanzer I

Another good reason for buying Wargames, Soldiers & Strategy 86 (see previous post) was the discovery of Gaming Models, a small-scale manufacturer in the U.S. doing 15mm resin models of WW2 vehicles. To my delight, they did a model of the Kfz.13 armoured car, which I have been pining for for some time as the final vehicle I really wanted to add to my Poland 1939 collection.

For a company I had never heard of, Gaming Models do a surprisingly extensive range, often including vehicles not available elsewhere. The models can be purchased unpainted, undercoated, or 'table ready' with a basic paint job. The cost per model is a standard $5.00. The models are very much 'wargames standard', and probably wouldn't please a dedicated modeller, but I found they were fine for the wargames table. To be honest, the painting standard of the 'painted' models was a bit basic even by my standards, so I opted for undercoated vehicles which I finished off myself. I bought a couple of Kfz.13s, a Kfz.14 radio vehicle and two Munitionspanzer Is, the latter being the kind of thing that can be very useful when playing Battlegroup Blitzkrieg, and which are also not available elsewhere in 15mm (to my knowledge).

The photos below will tell you most of what you need to know about the models themselves. Generally casting is good, although the detail in the models can lack the crispness most of us have come to expect these days. One of the Munitionspanzers had a bit of a problem with pinholes in the resin - I managed to fill some of them but doing so is fiddly and at wargames ranges you probably won't notice those that remain. You will also have to find your own crew figures - I managed to dig out some old metal and plastic figures that could be squeezed in with a little surgery. 


The munitionspanzers compared to Skytrex Pz.Is and Pz.IIs.
They fit in very well. 

Whilst on the Gaming Models sight I found something else I couldn't resist - they do a wargamers' periscope for just $15. I have wanted one of these since I first heard The Lionel Tarr Periscope described in Donald Featherstone's War Games, but making one myself always seemed likely to end in tears. 

Mr Tarr recommended using a cardboard tube 9-12 inches in length, and I am happy to say that the Gaming Models 'terrain scope' is 11 inches high, and made from a solid plastic square-section tube which comes in a nice shade of olive/khaki. This is just the kind of whimsical accessory that perfectly suits our hobby, and will be fun to wield during games with friends. Who knows, it might even come in useful occasionally! The odd LOS dispute does come up in my Battlegroup Blitzkrieg games. I should also add that Craig from Gaming Models let me have the periscope for free, as a kind of 'welcome to Gaming Models' gift. Thank you Craig, that was very generous.


Target in sight! The view through the periscope.

Service from Craig is exceptional and very friendly. I had my items from the U.S. in two weeks, and paid $16 postage and packing on a $25 order, which I thought was reasonable. All in all, if you're gaming WW2 in 15mm the Gaming Models site is very worthy of your attention.