Following an autumn dedicated to SYW gaming, I have finally turned back to WW2. I decided to get the 6mm Western Desert stuff out, using (of course) Blitzkrieg Commander as my ruleset. Funny really: at the height of my concentration on SYW, I had actually considered selling my GHQ Western Desert collection to make money for more SYW purchases. Luckily I had the sense to realise I would return to my other interests in time.
This will be a fairly long post: as with some previous Western Desert reports, I find it fun to mix in some real photos of the actual area and consider some of the scenario alternatives. Once again I turned to the Command Decision scenario book Benghazi Handicap by Frank Chadwick for inspiration, and chose the scenario 'Rally Forward', which covers the German attempt to recapture Fort Capuzzo from the British on the second day of Operation Battleaxe, June 16th 1941. In the original battle the Germans failed to re-capture the Fort, due it seems to a stubborn, well conducted British defence supported by tanks, an unusual lack of tank/infantry cooperation on the German side, and a lack of German resources in infantry. I went with the forces and map given in the book, though Barrie Pitt's Crucible of War: Wavell's Command might suggest some alterations, which I will mention at the end.
Here then is the game map reproduced from the book. Designed for a 6' x 6' table using 15mm miniatures, 4' x 4' would be fine in 6mm:

Below are the German forces as outlined in the book. It is easy to convert to the BKC equivalent as Command Decision uses the same ratio of models to real troops. However, the BKC website includes a download called 'Converting Orders of Battle' which gives some useful advice if you want it.

So for BKC these forces came out as:
CO, CV10. 1 recce unit (PzII)
1st Bn, 8th Panzer Regt
HQ CV9, 2 PzII, 2 PzIII, 1 PzIV
2nd Bn, 8th Panzer Regt
HQ CV9, 2 PzII, 4 PzIII, 1 PzIV
Regimental Troops, 8th Panzer Regt
HQ CV9
3 infantry units + ATR upgrade, 1 MG unit, all on motorcycles
3 infantry units + ATR upgrade, 1 MG unit, all in trucks
1 37mm ATG unit with tow
1 50mm ATG unit with tow
1 88mm ATG unit with tow
2 20mm Sdkfz10/4 units
1st Bn, 33rd Artillery Regt
FAO CV8, 3 105mm artillery units (off table). 6 artillery assets.
Below is the British OOB from the book and the BKC equivalent I used:

CO, CV8. 1 recce unit (scout carrier)
1st Bn, The Buffs
HQ, CV7
12 infantry units + ATR upgrade
1 mortar unit
2 2pdr portee units
1 2pdr ATG unit with tow
7th RTR
HQ, CV7, 4 Matilda II
Battery, 31st Field Regt
FAO CV7, 1 25pdr artillery unit (4 gun, off table). No assets.
This gave the Germans 2745 points, with a breakpoint of 11 (13, minus 2 for flexible doctrine). The Brits had 1580 points, breakpoint 10. I decided to play the game as an Assault scenario, but allowing no flank deployment as this was not indicated in Benghazi Handicap. The points advantage for the Germans was well over the 50% allowed for in BKC, but it still seemed the Germans had their work cut out. They had half the infantry the Brits had, and a limited advantage in tanks, especially considering how tough the Matildas are. Their main advantage was in artillery, and their superior CVs. As all the Brits would be able to dig in, we decided to use the 'auto suppress' optional rule, and extend it's use to on-table HE fire from mortars, infantry guns and tanks etc. In particular this would give the Germans the option to use their PzIVs in their historical role of bombarding and suppressing the British 2 pdrs.
For a bit of period flavour, the photos below give some contemporary views of Fort Capuzzo and the surrounding terrain:


The Game

First photo shows my interpretation of the game map, looking from the north (German) table edge. Tarmac roads in dark grey, tracks in yellow. Shallow wadis are represented by brown felt shapes: these are treated as high area terrain for movement purposes. Units in a shallow wadi can claim partial cover but do not receive a save value. The rough ground (shown by the fine gravel scattered in the bottom right hand corner) attracts the dense terrain command modifier but offers no cover.

British set up. All 4 Matildas are dug in on the British right flank, an interesting tactic which shut off this flank from the possibility of attack as far as I was concerned (as the German player).

If any reader doubts whether the Brits would have dug-in their Matildas, here is a photo from Tobruk around the same period. With only the turret exposed, a very tough nut to crack.

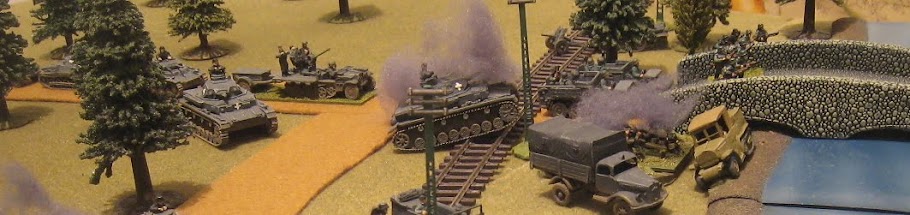
The Germans enter the table, with the stronger panzer unit aiming for the weaker British left flank. They would have to find gaps through the wadis, relying on arty and direct HE to suppress the British 2 pdrs. The weaker panzer battalion is on the German left flank and would play a waiting game. Infantry support in the centre, with ATGs leading.

The auto-suppress rule payed off well for the Germans throughout the game, as can be seen by the measles rash of red dice in this and later photos. We thought this historically sound.

German right flank creeps steadily forward. One portee 2pdr has been KO'd, but the British mortars have claimed the 88mm near the road.

The threat to the British left forces Paul to move his Matildas out of their pits and move them round the back of the fort. The HQ of 7th RTR has been knocked out by artillery in a freak rash of sixes (bottom right).

Now is the time for the German left flank armour to advance, but in typical BKC fashion the command rolls failed at the crucial moment. German FAO in foreground, who was vital to the advance.

Auto-suppression cuts both ways. We were using the 'reduced artillery fire zones' optional rule, which gave the Brits only a 10cm circle for their arty. Nevertheless, here they have a successful shoot against German tanks and infantry bunching up as they negotiate the line of the wadis.

As the game nears its end, the Germans close in on the fort, aided by suppressive artillery and direct HE fire. The tank duel between the panzers and Matildas (centre background) starts to go in the German's favour, now that the Matildas are in the open. The British were hampered by their low CV, not getting in enough fire orders to tip the balance in their favour. The German left flank Panzer Battalion has caught up.

Last move, move 8. The German infantry have broken through on the British left flank following a close assault, and have managed to get 2 units into the fort, but this is not enough. The Matildas are scattered, with 1 knocked out, 1 suppressed and fallen back, and a third skulking behind the fort to avoid German fire. In a desperate final charge the German 1st Panzer Battalion lunge towards their objective but lose 2 tanks destroyed and 1 suppressed (the latter out of picture to the left), demonstrating the likely result of doing without covering fire. Overall, the Germans have been cautious, advancing under the cover of suppressing fire, and have lost only 5 out of a breakpoint of 11. The British end on 6/10, including their destroyed HQ from 7th RTR. The result then is a minor victory for the British.
And in conclusion...
A most enjoyable game. Just for once I tried hard to think about my tactics rather than just charging in, and it almost worked. Things would have been much tougher for the attackers if the auto-suppress rule had been limited only to artillery, though I leave it to you to decide whether our modification is justified.
In Wavell's Command, Barrie Pitt indicates that 15th Panzer Division had 80 tanks available for this attack, which would work out to 16 tanks rather the 12 we used, if you assume 5 tanks in a German tank platoon. He also suggests the presence of German engineers, so perhaps a company of these could be included. His battle account is not detailed however, so for this game I took Frank Chadwick's word for the balance of forces. Having the British 25pdrs on-table (another option suggested by Pitt's account) would make the British anti-tank defence rather too strong, in my opinion. Despite the historical validity of digging in Matildas, I don't think this was actually done in the battle itself, so perhaps only the British infantry should be allowed to dig-in, which would help the Germans.
And finally...
A couple of photos I found online showing how other gamers have represented Fort Capuzzo. The lower photo in particular shows a rather different interpretation of the surrounding terrain.

http://willwarweb.blogspot.com/2008_06_01_archive.html
(A game put on by the Society of Gentlemen Gamers)

http://saskminigamer.blogspot.com/2008/02/wargames-weekend-08-part-2-saturday.html
Hope you enjoyed the post. Once again, best wishes for 2011 to all visitors. Leave a comment!