It's been quite a few months since my 1939 Polish-German forces had an outing, so I decided to give them a go last night. I also decided to make it a reasonably big game (by my standards) to see how far we could get. I won't overdo the detail of how the game progressed, but present you with some captioned photos and some general points that the game raised in my own mind.
The game was a fictional scenario. It imagined a bridgehead across a river held by elements of a German Light Division. These elements are counter-attacked by a strong Polish force trying to eliminate the bridgehead and recapture the two bridges the Germans have used. German reinforcements are on the way. The game used a 6' x 6' table, the miniatures being 15mm size. Details of the forces were as follows:
Poles
CO (CV9)
Infantry Battalion x 2
HQ (CV7), 8 infantry units, 2 mg units, 1 37mm ATG+tow
Cavalry Regiment
HQ (CV8), 8 cavalry units, 2 mg units, 1 75mm unit+horse tow, 1 Wz34 (recce)
Armoured Battalion
HQ (CV8), 5 7tp (37mm), 1 7tp (mg)
Recce Battalion
HQ (CV8), 2 TKS (mg), 1 TKS (20mm), 3 m/c units
Artillery Battalion
FAO (CV7), 3 75mm artillery units, 6 assets
Artillery Battalion
FAO (CV7), 3 100mm artillery units, 6 assets
Karas Flights
2 Karas units, 2 assets each
Points: 2030 Breakpoint 23 (25% = 12)
Deployment/Victory Conditions.
All units use static deployment on baseline from move 1. Capture both bridges for major victory. Capture one for minor victory.
Germans
Initial Forces
Infantry Battalion
HQ (CV9), 6 infantry units, 2 mg units, 1 mortar unit, 1 37mm ATG+tow
Recce Battalion
HQ (CV9), 1 Sdkfz 231, 1 Sdkfz 222, 1 Sdkfz 221, 2 m/c units, 2 cavalry units, 1 mg unit+truck
Artillery Battalion
FAO (CV8), 3 105mm artillery units.
Reinforcements
Light Panzer Battalion
CO (CV10), 3 PzI, 3 PzII
Motorcycle Battalion
HQ (CV9), 6 m/c units, 2 mg units+2 trucks, 1 37mm ATG+tow
Stuka Staffel
FAC (CV7), 1 Stuka unit
Points: 1580 Breakpoint 17
Deployment/Victory Conditions.
Initial forces deploy dug in (except vehicles) anywhere in own half of board. Reinforcements use mobile deployment from baseline from move 4. Break Polish battlegroup for major victory. Cause 25% casualties for minor victory.
Notes.
Making up a Polish battlegroup of sufficient striking power to have a chance at a successful attack during an evening's wargaming usually involves creating a fairly non-historical force. This game is no exception, as Polish experts will be able to tell.
The recce formations on both sides were treated as fighting units. The only unit which counted as 'recce' for the purposes of the rules was the armoured car with the Polish cavalry. The Polish cavalry, recce and tank formations were all given an extra point to their CV (representing their 'elite' status). Even so, the Polish attackers were only about a third stronger in points than the Germans, although not all German forces would be present at game start. All artillery was off table except the 75mm unit attached to the cavalry. This is how the game panned out:
 This gives you an idea of the layout. The first move was a dream for the Polish player (myself). The cavalry leapt ahead on the right flank (four orders) and there were multiple orders for all formations, except the armour who received only one. Ah well, they would soon catch up, I thought. Wrong! The Germans had their infantry nicely dug in on one flank, with the recce waiting behind the village.
 Massed Polish infantry on move 1.
 Cavalry race ahead on the opposite Polish flank.
 The slower MG carts and 75mm gun have fallen behind a bit.
The CO looks on from the hill.
 An unusual encounter on move 2: recce vs. recce. The German armoured
 cars provide cover whilst the rest of their formation rushes to redeploy to
the bridge on the German left flank. German FAO in village.
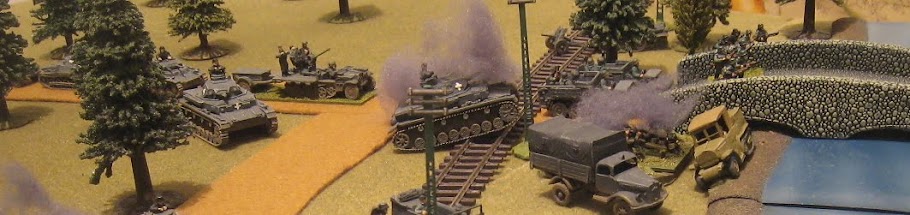
 A nice bit of smoke intended to mask any German units in the village
 from interfering with the advance of Polish mobile units on the
Polish right flank. This is move 2.
 Poland's shame: or, Put that clipboard down and get moving!
 Move 3 and the tanks haven't budged. In the distance the cavalry are
desperate for their support to break through to the bridge.
 Meanwhile the Germans on the other flank easily hold the attackers.
They had 3 or 4 orders each move after the first, blasting the Poles with
fire and causing heavy casualties as well as numerous suppressions.
 And on move 4 they were joined by the Motorcycle Battalion
 advancing in fine style. This flank was never threatened: a comparison with the earlier photo will show that the battalion commander has dismissed his command car and broken out the picnic table.
 The Polish tanks finally move but too late. The German recce have formed
a blocking position and the Polish cavalry have been stopped.
The Polish recce formation has also been stalemated.
 Move 4 and the German tanks arrive and cross the bridge on the
 German left flank. No way through here for the Poles either. Game over!
After the battle.
We had an interesting and pleasurable three-and-a-bit hours of gaming with this scenario, but it raised some interesting points for me.
Firstly, although we only had time for 4 moves, it was quite obvious that the Poles couldn't win once the German reinforcements had arrived. And we had had so many multiple orders that 4 moves of BKC was as good as 12 moves of a more traditionally structured set of rules.
Was the scenario properly balanced? It was still a tall order for the Poles. Nevertheless, if the tanks had had the same luck as the cavalry, it could have been a very close game. Perhaps next time I would motorise one of the Polish infantry battalions, and have the Polish start line 30cm in rather than the standard 20cm, to make the task that little bit more achievable. Another 'fix' might be to put back the arrival of the German reinforcements by a move.
My tactics as the Polish player left something to be desired. I used the CO's re-roll ability a couple of times (to little effect), but I should have done the obvious and placed the tanks directly under the CO's command from move 2. The attacking infantry battalions were easily seen off: the one nearest the centre should have moved out wider and attacked the Germans in flank, or gone through the village and straight for the bridge. But there was probably not enough time for an infantry unit on foot to complete such a manouevre. I also have the feeling I didn't make full use of the quite powerful Polish artillery.
I have two possible explanations for my poor performance. One is the bottle of Chilean Chiraz that Paul brought over: shades of last month's Belgian beer! The name on the bottle was Casillero del Diablo: Cellar of the Devil. Yes, quite. But really I think the reason was that after spending about an hour setting up an evening game, maybe following a days work and cooking dinner, I tend to want to sit back and just enjoy watching the game unfold. Actually putting some thought into winning seems to go by the board. Does this happen to any of you? I also find not having a proper wargames room a real pain in the backside: setting up then taking down in the same session can sometimes seem a bit too much like work. Which makes another reason for relaxing and mentally sitting on your hands during the game.
D12 vs 2D6
Most BKC-ers who use the BKC forum will have come across this idea. The problem of how to get the most from low CV armies forms the content of quite a number of posts. One way is to use a D12 for command rolls rather than 2D6. This flattens the probability curve and improves the chances for a low CV army. For example, the chance of throwing 7 or less is the same with a D12 or 2 D6. However, you have a 42% chance of throwing 6 or less with 2D6, but a 50% chance of doing the same with a D12. For 5 or less, the difference is really significant: 28% with 2D6, 42% with a D12. At the other end of the scale, to throw a 9 or less with 2D6 is a probability of 83%, but 75% with a D12. Thus, in this game, the Germans would be penalised slightly and the Poles given a leg up, making things a bit more equal whilst retaining the uncertainty of the dice.
The chances of a 1 or 12 with a D12 (for a bonus or blunder) are higher (by three times) than the chances of a 2 or 12 with 2D6. You can either accept this or add a second throw with a single D6 to decide whether that was a real bonus/blunder or not.
We used a D12 in this game, and have used this technique quite a lot in the past. The effect is quite noticeable after two or three games. For games where the CVs are more equal (like the desert scenarios on this blog) we continue to use 2D6.
Well, that's all for now. Comments on all the above would be very welcome. I think there's still half a glass of that Chiraz about somewhere. Cheers!

